
Slicing and Exporting Segments
The Recording Inspector (under Dataset Manager) lets you visually mark time segments on a spectrogram, preview exactly which segments will be exported, and queue an async export job — all from the browser. Use it to extract clean signal windows from longer recordings before feeding them into the Curator.
Opening the Recording Inspector
Section titled “Opening the Recording Inspector”- Click Dataset Manager in the top navigation.
- Select Recording Inspector from the tool list.
- In the Repository field, type or select the repository that contains your recording.
- In the Recording dropdown, select a
.sigmf-datafile. Only recordings with a registered LFS object ID appear in the list.
The spectrogram generates automatically. A spinner shows progress while the backend task runs — typically 5–30 seconds depending on recording length.
Navigating the spectrogram
Section titled “Navigating the spectrogram”Once the spectrogram loads, use the toolbar controls to orient yourself:
| Control | Action |
|---|---|
| + / − | Zoom in or out along the time axis |
| Fit | Reset the view to the full recording duration |
| Pan mode | Drag to scroll left/right within the current zoom level |
The status bar at the bottom shows your cursor position in seconds, the current view window, and the total recording duration.
Marking keep and discard regions
Section titled “Marking keep and discard regions”Switch between the three tool modes using the toolbar buttons at the top right of the spectrogram:
| Button | Mode | What it does |
|---|---|---|
| Keep | Keep | Drag on the spectrogram to mark a region you want to export — rendered as a teal/green overlay |
| Discard | Discard | Drag to cut a hole out of a keep region — rendered as a red overlay; useful for removing brief interference or squelch gaps |
| Pan | Pan | Drag to scroll left/right without creating a region |
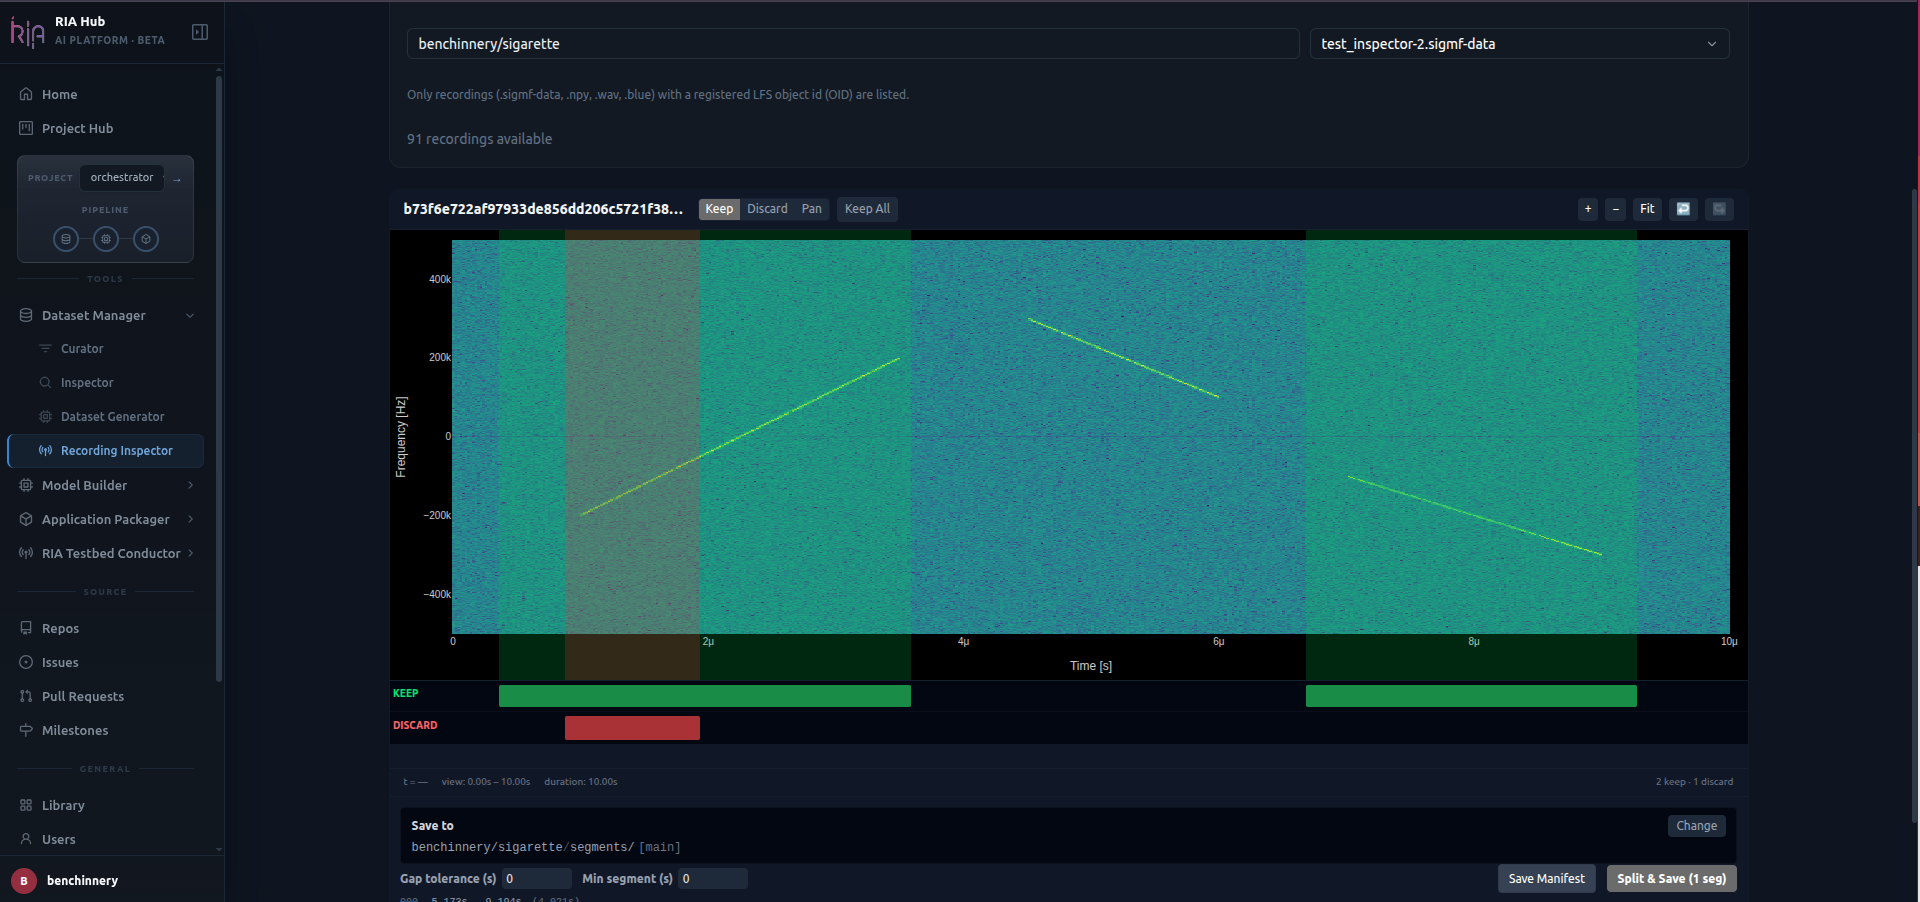
The screenshot above shows two keep regions (teal) spanning most of the recording, with a discard region (red) punched through a portion of the first keep window.
How to mark a region
Section titled “How to mark a region”- Select Keep or Discard from the toolbar.
- Click and drag horizontally across the spectrogram. Release to commit the region.
- The region appears immediately as a coloured overlay and is added to the timeline track below.
Tip: Zoom in first (use + or scroll) to place boundaries precisely, then zoom back out with Fit to review the full recording.
How regions interact
Section titled “How regions interact”Keep and discard regions are resolved in this order:
- If any Keep regions are marked, only those regions are exported.
- Discard regions are then subtracted from any keep region they overlap.
- If no Keep regions are marked, the entire recording is treated as a single keep region (minus any discards).
Overlapping intervals of the same type are merged automatically.
Timeline tracks
Section titled “Timeline tracks”Below the spectrogram, the KEEP and DISCARD timeline tracks show all committed regions as labelled blocks scaled to the recording duration. Hover any block and click the × button to remove it.
Undo and redo
Section titled “Undo and redo”Every add or remove is tracked in a 50-state undo history. Use the ↩ and ↪ toolbar buttons to step back or forward.
Export preview
Section titled “Export preview”The Export Preview panel updates automatically as you mark regions. It shows:
- The list of segments that will be written, with start time, end time, and index
- Total duration across all segments
- Any warnings — for example, if a segment is shorter than the minimum segment length setting and will be dropped
Export settings
Section titled “Export settings”| Setting | Effect |
|---|---|
| Gap tolerance | Bridge gaps smaller than this value (seconds) between adjacent segments — useful when keep regions have tiny holes from discard overlap |
| Min segment length | Drop segments shorter than this value; they appear in warnings but are not exported |
| Naming pattern | Template for output filenames — available tokens: {stem}, {ext}, {index:03d}, {start_ms}, {end_ms} |
Export destination
Section titled “Export destination”Set the Repository, Branch, and Folder for the output files. Exported segments are committed as SigMF file pairs (.sigmf-data + .sigmf-meta) to that location.
Saving and running the export
Section titled “Saving and running the export”Save Manifest
Section titled “Save Manifest”Click Save Manifest to persist your keep/discard selections without triggering an export. The manifest is stored against the recording’s OID and is restored the next time you open the same recording in the inspector.
Edit & Save
Section titled “Edit & Save”Click Edit & Save (N seg) to save the manifest and immediately queue the export job. The segment count shown in the button (e.g. 77 seg) reflects the current Export Preview — it updates live as you adjust regions or export settings.
A task ID is returned immediately and the export runs in the background. Poll the task status via the RIA Hub task panel, or check the destination repository once the job completes.
Exported segments appear in the Library automatically once they are pushed to the destination branch.
Manifest persistence
Section titled “Manifest persistence”Your keep/discard selections are saved as a manifest linked to the recording. If you close the inspector and return to the same recording, your selections are restored exactly as you left them.
Supported recording formats
Section titled “Supported recording formats”The Recording Inspector accepts formats with a registered LFS OID:
| Format | Extension |
|---|---|
| SigMF | .sigmf-data (paired with .sigmf-meta) |
| NumPy | .npy |
| WAV | .wav |
| BLUE | .blue |
SigMF is recommended — the companion .sigmf-meta file carries sample rate and center frequency metadata used to annotate the exported segments correctly.
Next steps
Section titled “Next steps”- Curate the exported segments — Feed the exported segment files into the Curator to slice them into fixed-length examples for training.
- Inspect signal quality first — If you haven’t checked the recording yet, use Inspecting Recordings to assess the spectrogram, constellation, and PSD before marking segments.